Contents
Overview
UV mapping is the process of applying a texture to an object. When creating static meshes for Unreal Tournament levels, UV maps are usually created (using the Map->New UV Map option) for one of two purposes:
Applying materials or skins to an object
A surface with the name of an existing Unreal Tournament material (such as the concrete texture 'bas02ha' from the Humanoid Architecture texture set, for example) is applied to various polygons in the object, and the texture scaling is adjusted by selecting particular parameters in the 'Make UV' property box, or by manually stretching the polygons in a UV view, for example, until the texture has the correct proportion and scaling. In this case polygons may overlap in the UV space/view, or may extend outside the unit UV coordinate space.
Alternatively, the UV map may be created such that there are no overlapping polygons in the UV space (for example using the atlas projection of the 'Make UV' tool in Lightwave 8+), so that a 'skin' texture can be created and overlaid over the object. If the object is a human head, for example, the skin could be a hand-drawing of the eyes, mouth, nose, hair, which would be overlaid over the relevant parts of the object by careful manipulation of the UV mapping.
Both types of mapping may be used within the same UV map, with the skinning approach used for one surface type, and the material stretching/alignment used for other surface types, for example.
Global surface mapping properties can be set in the surface properties of a surface, but the Unreal Tournament editor ignores these in favour of explicitly defined UV maps (it uses the first-defined UV map?).
The tutorial below explains how to create a simple skin for an object in the Lightwave modeller program.
Creating a light map for an object
A mapping of polygons to the UV space is chosen (usually via the atlas 'Make UV' option in Lightwave 8+) such that there are no overlapping polygons in the UV space, and all of the polygons are spaced uniformly within the unit (0,0,1,1) UV space. The UV mapping is independent of, and usually additional to, any UV maps which map on existing materials or skins. The light map UV map exists to allow light maps to be created by Rendering lightmaps in Lightwave and then applying the rendered lightmaps to static meshes within the Unreal Tournament editor. Light maps are normally overlaid on static meshes using the UV2Texture display property; light map UV maps must normally be given the name 'UV2' (hence the name 'UV2Texture' and for reasons relating to compatibility with 3D Max).
Often, an object is defined in Lightwave with both a material/skin texture mapping UV map (called, say, 'UV1') and a lightmap UV (called 'UV2', as discussed further in UV2Texture), so that fine texture detail can be provided without requiring a correspondingly high resolution for the lightmap.
UV skinning tutorial
Work in Progress
UV Mapping in Lightwave is a breeze thanks to the additions to Lightwave 7.0. The mapping tool tab contains most of the tools you'll need for all your UV mapping needs. In this tutorial, I'm using Photoshop however because Lightwave supports many different image formats, you can really use any image editor, even Windows Paint.
Prerequisites
- Lightwave 7.0 (or greater)
- A Lightwave model (download mine)
- Image Editor (Photoshop Recommended)
Model Preparation
For this tutorial, I will be using a simple premade object. You can download this object here if you wish. In this tutorial, we will be using the Image Editor and the Surface Editor a lot so you may want to familiarize yourself with them. The buttons to access them are at the top left, however, by pressing CTRL+F3 you can get the surface editor and CTRL+F4 gives you the image editor.
The first thing we want to do is create the templates for our model. The templates give us an area where we can tell where the face begins and ends. It is a 2 dimensional image of the wireframe underneath the face.
Grouping the Polygons
Coming Soon...
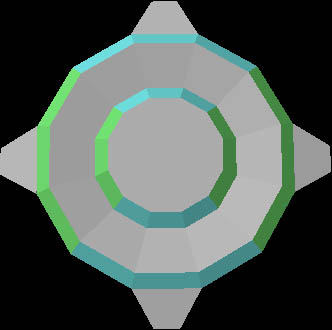
After you've read this section, you should see something similar to this:
Although you can literally jam every polygon onto the UV Map it's sloppy and I don't recommend it. I'm going to create a UV map for every side. Since we're looking at this model from the top, I've color coded the different sides accordingly.
| Top and Bottom Side Panels | Z Axis | Blue |
| Left and Right Side Panels | X Axis | Green |
Disconnecting the Groups
Now the next thing we need to do, is separate these sections from the model. We need to do this so that we can line all of the faces up right. I'll explain why later.
The best way to do this is to open up the polygon statistics window using the 'W' key. Scroll down to Surface. It should be the 3rd item from the bottom. Select Side_Side_Panels, and press the + sign. This should select all the polygons in that group. Now just quickly press 'X' then press 'V'. This cut's the selected polygons from the model and pastes them back in but it also disconnects them from the rest of the model, which is what we want. Do this for the Top/Bottom_Side_Panels group as well.
Now we're ready to make our template.
Making the Template
Now that we have the model divided into sections, and those sections disconnected from the rest of the model, we can now safely create our templates. In the top left viewport, click on the 'View Angle' button and scroll down to 'UV Texture'.
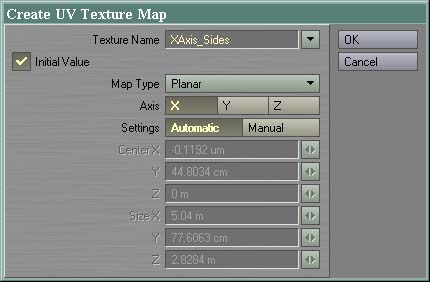
So what you want to do is select one of your groups, again you can use the polygon statistic window for this. Select the Side_Side_Panels group. Now click on the Map tool tab at the top, and then click on New UV Map. A dialog appears similar to the one below.
Because the right and left sides of our model are on the X axis, let's name this map XAxis_Map. And make sure that the X Axis button is press. If you choose either of the other buttons, it will render the mesh differently. Although you can still move and resize the mesh, setting it to X now, will eliminate most of the hassle. Now click ok.
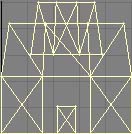
You should now see the selected polygons in the top left viewport. Since Lightwave tries to cover the entire area with the polygons, you'll see that they are quite out of shape:
This is really easy to fix using simple mesh modify tools. First, go to the Modify tool tab and select the 'Stretch' tool (h). Then click and drag in the top left viewport until the mesh looks similar to your model. We do this so that it's easy to see how big the polygon faces are when we're coloring over the template.
It looks a litte better, but there's still something wrong. The top portion is begin overlapped by the bottom portion. We can't leave it like this because the texture on the top portion will be messed up so we have to move it. At the bottom, press the 'Polygons' selection tool. Deselect all the lower portion polygons and leave the top ones selected. Then using the move tool (t), move the selection up so that it doesn't touch the lower section at all:
There. This should create a perfect template we can use to draw a texture. Next we'll copy this, and paste it into our image editor (Photoshop).
Creating the Texture
Now, to copy this into Photoshop, we're going to use the Print Screen button. It should be located near the top right corner of your keyboard. Press it once and it should copy everything you see onto the clipboard.
Now open Photoshop (or whatever image editor your using). In Photoshop, you must create a new document, so do that now. Photoshop automatically detects the size of the image on the clipboard and sets the dimensions for you. Press CTRL+V to paste the image.
Now there are several ways to go about getting what we want, and what we want is the smal grid in the top left layout view. It has our templates right there. You can either select it with the select tool (M) or move it to the top left corner and adjust the dimensions of the image. The easiest way is to select it, then copy it using CTRL+C.
Now, create a new image, again Photoshop puts the dimensions in for the clipboard item. Paste it in using CTRL+V. Ok you now should have a template that looks exactly like the grid in Lightwave. Using thise template you can create a texture. Anything inside the mesh line is what is going to appear on that part of the mesh.
Since this is just a tutorial, let's do some quick drawing:
It doesn't matter if you go over the lines, only what is inside the lines is going to appear on the model. And since I want to get this done and I'm lazy, I'm only going to paint the top portion of the mine. Ok so now you need to save this image as any of the formats listed below:
Supported Image Formats
| BMP | Bitmap |
| JPG/JPEG | JPEG |
| PSD | Photoshop PSD |
| TGA | Targa |
More coming...
I like Bitmap because it is very portable between programs. So save it as something like XAxis_Panel.bmp.
Applying the Texture
Now we're ready to put the texture onto our mesh. Let's go back into Lightwave now. Click on the surface editor button or press CTRL+F3. On the left side, you should see the list of your groups. Select the Side_Side_Panels. Now making sure that you're in the basic tab, click on the Texture button beside the color. The Texture button is the button with a little T.
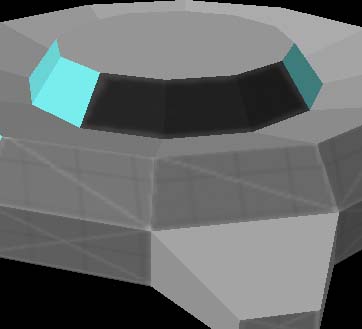
This is the texture window. For projection choose UV, for UV Map choose XAxis_Sides, and for Image choose 'Load Image', and choose the image you just saved. Now go to the top left viewport, and change the angle to 'Perspective', and change the render type to 'Texture'. You should now see your texture applied to the right and left sides of the model!
This is all good but we still need to texture our top/bottom sides. Since we've already got everything setup, this should be a breeze. Using the Polygon Statistics (W), select the Top/Bottom_Side_Panels group. Make sure nothing else is selected and click the 'New UV Map' button.
Call this one 'ZAxis_Map' and set it's axis to Z. Press ok and you should see your selected faces in the top left viewport. Now to make things really easy, click on the render options button (the one wiith just a down arrow) and choose the image you just saved.
Scale your model using the modify tools until it fits the template. If you want find control, use the 'Drag' tool (CTRL+T). This allows you to move the points into perfect positions. Now you'll notice that even though the model is lined up, it still doesn't show on the model.
Go back into the surface editor, and choose your Top/Bottom_Side_Panels group. Click the texture button next to color. Same thing as last time; Set Projection to UV, set UV Map to ZAxis_Map, and set image to your image. Press 'Use Texture', close the surface editor and all the sides of your model should now have the texture.
Discussion
Amen: Wouldn't lightwave's anchor UV Map type do this quicker?
Mosquito[L5]: Possibly... You have to remember that I'm not as good as some people, and this is what I know. If you have a suggestion that would be better, by all means, create a tutorial for it.
Fat Marrow:This is a bit of a placeholder revision – I'm hoping to add more (possibly to other pages) about rendering lightmaps in Lightwave and related topics (learnt the hard way).


