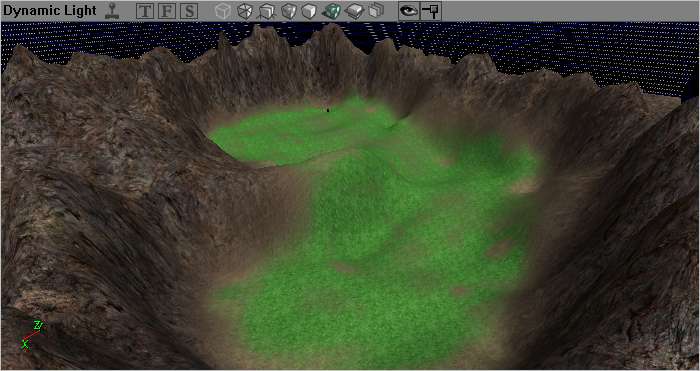
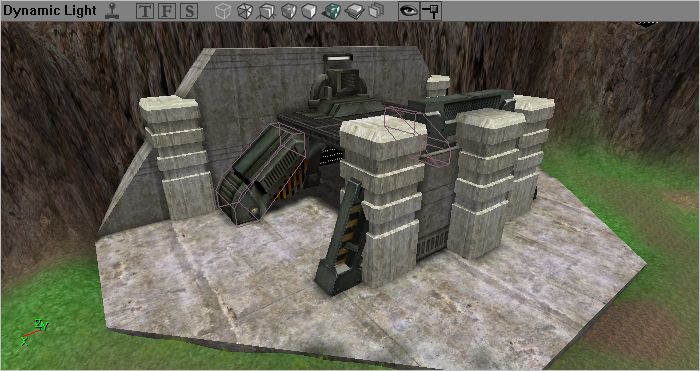
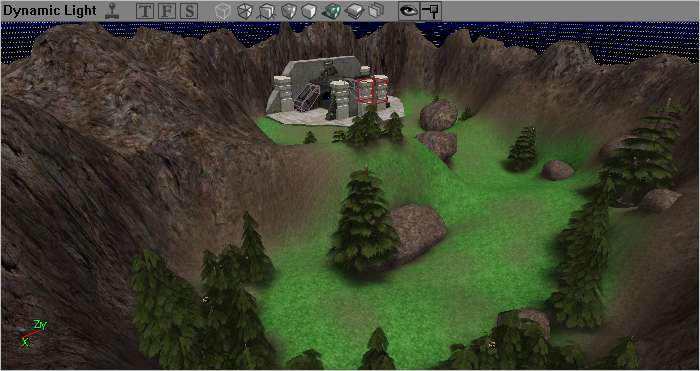
For those following along on the Assault Mapping Tutorial who want to build the tutorial map themselves (or are just curious how it was done), here are the steps needed to build our cozy little place I like to call "Tutorial Valley". After following these steps you should have something pretty close to the example map (which is also available for download. See the link from the main page of the tutorial).
Anyway, the steps are as follows:
- Set the 3D view to Textured mode. This will make it easier to see what we're doing before lights are added.
- Subtract a Space of size 8192x8192, height 4096. (It doesn't matter what texture you give it, because we'll be setting all the walls to "Fake Backdrop" for a skybox later anyway. In these situations I like to use something semi-transparent like Editor.MaterialArrow to remind me that these walls are there, but they aren't "real")
- Add an Actor>>Info>>ZoneInfo to the subtracted space (doesn't really matter where; I like to put it near the center).
- Add a terrain using Terrain Mode. Make the terrain 128x128 in size. Place the new TerrainInfo actor in the center of the subtracted space. (note that by using the Terrain Tool to create the terrain, it automagically sets TerrainZone to true in the ZoneInfo we just added, which is good, because we'll need that)
- Choose an appropriate dirt texture (say AbbaddonTerrain.ground.dirt01GO) in the Texture Browser, and then add a base layer to the new terrain using Terrain Mode tool. Be sure that the "Alpha Fill" setting in the new layer window is set to white (255,255,255). (if you now rebuild the map, a flat terrain should appear covering the entire width and depth of the subtracted space. If it doesn't, double-check the TerrainZone setting in the ZoneInfo, and make sure the 3D view is set to Textured mode instead of Dynamic Lighting.)
- Use the Paint and Smoothing tools in the Terrain Mode window to shape the terrain into a curved valley, with hilly peaks all around.
- Choose an appropriate grass-like texture in the Texture Browser and create a second layer. This time, set the "Alpha Fill" setting to black (0,0,0) (this will cause the layer to be initially completely hidden). Use the Paint tool from the Terrain window to paint the grass texture over the floor of the valley. (Use a little bit of variation, in the real world, grass doesn't all grow uniformally) [Note: There is apparently no actual "grass" texture shipped in any of the modules of the entire UT2004 game. I had to create my own (by taking the "ground.moss01ar" texture from the "ArboreaTerrain" package, loading it into a paint program, adjusting the color to be greener, and blurring it slightly). You can just use the moss01ar texture itself (as many maps apparently do for grass), but it won't look as good.]
- Choose a rock texture (such as AbaddonTerrain.ground.flr18go) and create another layer for the Terrain. Again, set the initial alpha fill to black (0,0,0). Paint this texture over the hills and peaks surrounding the valley.
- Open the Static Mesh Browser and load the "ArboreaHardware" package. Select the Organics.ArbGrassA static mesh. Go to the Terrain Mode window and create a new decoration layer using this mesh. Tip: We could create a new alphamap for the density of the decoration layer, but instead, set the density map for the deco layer to be the same one already used for the alphamap for the grass layer. This way, anywhere grass is painted will automatically get grass meshes as well, and the grass meshes will change automatically if you change the grass layer. (Note: the deco layer meshes won't show up yet until you change some of the properties mentioned in the next step)
- Now we want to tweak some aspects of our new terrain to make things look a bit better. Select the TerrainInfo actor in the map, and set the following properties:
- TerrainInfo->Layers[0] (the dirt)
- (No changes needed)
- TerrainInfo->Layers[1] (the grass)
-
- UScale = 4
- VScale = 4
- TextureRotation = 4096
- TerrainInfo->Layers[2] (the rocks)
-
- UScale = 32
- VScale = 32
- TerrainInfo->DecoLayers[0] (the grass meshes)
-
- AlignToTerrain = 1
- DensityMultiplier = (Min=0.5, Max=0.5)
- DrawOrder = SORT_BackToFront
- FadeOutRadius = (Min=1000, Max=2000)
- RandomYaw = 1
- ScaleMultiplier:
-
-
- X = (Min=0.5, Max=1)
- Y = (Min=0.5, Max=1)
- Z = (Min=0.25, Max=5)
-
- Create a Skybox outside of the area we're using for the map. We'll just use a clear blue sky for now, so create a ConstantColor texture with a nice shade of blue and set all the walls of the skybox to that texture (for simplicity, make them unlit, so they show up the right color even without a light in the skybox). Next, set all the walls of our big space to "Fake Backdrop" so we can see the skybox through them (and so that the sunlight actor in the next step works properly).
Add an Actor>>Light>>Sunlight inside our space. Set the LightColor->Brightness to 80, and point it downwards at a slight angle. (You should now be able to rebuild the map and turn on Dynamic Lighting and see a nice peaceful, sunlit valley)
- Open the properties for the ZoneInfo actor and set the ZoneLight->AmbientBrightness to 32. In the real world, light gets reflected off of all kinds of things so even if you're not in direct sunlight there's still some light. This will keep the shadows from being pitch black and make things feel more realistic. (Note: Don't set AmbientLight too high, though, or static meshes will look strange (for some reason, static meshes don't get lit the same way by AmbientLight as everything else does, so they'll come out looking too light).)
- Pick a basic concrete texture, such as HumanoidArchitecture.Bases.bas10HA, and at one end of the valley, add a "cube" brush of size (height=128,width=1024,breadth=3072) and place it on the floor of the valley against the wall. Add another of the same size and also place it on the ground right in front of the first one. Use the Vertex Editing tool to move the front vertexes of the front slab closer together into a trapezoidal shape. Now we have an underlying slab for our new base structure. (Note that whenever you change the shape of a brush you need to rebuild the world geometry before you will see the change in the world.)
- Add another box of size (h=896,w=256,b=3072). Form it into a similar (upright) trapezoidal shape, and place it standing on the base slab, against the wall of the valley. This will represent the front wall of the part of the base which is dug into the mountain.
- Adjust the terrain shape so that it meets our concrete slabs around all the edges, and nothing is poking up through the slabs.
- The door to the actual base will be in the center of the upright slab, but we need some protection for it so a frontal attack isn't trivially easy. Add another vertical concrete slab of size (h=512,w=128,b=1024) about 1024 units in front of the back wall.
- For added support, and to give the defenders somewhere good to spawn, we'll build a ceiling stretching out from the back wall to the front wall, but we'll make this one a different texture. Choose the "Grates.grt025T" texture from the "Shiptech" package, and add another box of size (h=64,w=1024,b=896). Place it so that it connects the top of the front wall with the back wall.
- Now that we have all the basic BSP in place for the base, it's time to fiddle with textures. Adjust the scaling and position so that they look good and line up well with the edges and other pieces.
- Add some appropriate static meshes to make the base look more interesting. Five HumanoidHardware.Beams.jribbedcolumn01HA meshes (with a Z DrawScale3D of 2) will give it a good feeling of solidity, and we will add a couple of SG_LO_meshes.Cielings.LO_lee_arch meshes (DrawScale=2, partially embedded into the front wall) to look like extra supports and give a bit of added protection for the front of the roof. Add an X_cp_Evil.sg_Evildoorframe1 in the center of the back wall, the top should be protruding out of the roof (this both gives us a starting doorframe, and produces a nifty bit of some sort of equipment on the roof, for character). Finally, take a SG_LO_meshes.Doors.sg_Mech_ruggedframe2, set the X coordinate of its DrawScale3D to 0.75, place it against the back wall, and move it down so that the top forms a base for the "equipment" on the roof, to form an imposing, technological front for our base (this will also serve double-duty as a way for the defenders to climb down from the roof on either side). I also added a HumanoidHardware.Miscellaneous.MDoor01HA (DrawScale=1.5) around the remaining exposed area of the back wall for an actual door frame.
- Now, there is one problem here. The collision hull for the sg_Mech_ruggedframe2 is broken. If you try to walk on top of the sides of it when climbing down from the roof, you will notice that your character actually falls partway into the mesh, which just breaks the whole illusion of reality. To fix this bug in the mesh, we'll need to create a couple of BlockingVolumes to cover these portions so that people can stand on them correctly. Since these are an irregular shape, the best way to do this is to open the 2D Shape Editor, create a shape which is close to what we want, and extrude it into a brush shape. Then create the BlockingVolumes from this brush and place them over the "ramps".
There's just one last touch left for the entrance to our base: An actual entrance to our base. We need to carve a hole in the back wall to lead into the rest of the underground base. Make the builder brush into a (h=288,w=256,b=512) box, and place it inside the back wall, centered with where we want the door to be (this should be just slightly bigger than the mesh we've got for our doorframe), then hit the subtract button, and presto, we have a hole. But now we've got another problem: the hole is covered by terrain. To fix this, go into Terrain Mode and select the "Visibility" tool. Set the inner and outer radius down to 1, and (very carefully) control-click the particular terrain cells which are blocking the passage. (we will want to actually build the rest of the base later, but for now we'll stop here)
- Now it's time for a bit more decoration of the rest of the landscape. In the AntalusStatic package, there are a number of static meshes for cedar trees. Place some of these in appropriate places around the valley. For dense forest areas, we can overlap some of the tree group meshes to make them look even denser. Don't forget to vary the sizes appropriately.
- There is another problem here. There is apparently a bug in the rendering engine which causes the grass meshes from our decoration layer to draw even when they should be obscured by the tree leaves, which looks really strange. This is apparently due to a rendering glitch with Shaders (a Shader is used to make the branch texture in the default tree mesh two-sided, so it shows from underneath too). Since all we need is for the texture to be two-sided, we can get around this by using something other than a Shader which gives us the option of making something two-sided. Create a new ColorModifier based on the basic AntalusTextures.All.cedarbranch texture, set it to be two-sided, and we'll use that instead (this gives us the added benefit that we can tweak the tree colors if we want to). Set this new texture as a skin in place of the default tree branch texture for all of the tree static mesh actors. Fixed!
- Now, in the real world, evergreens and grass do not get along well (evergreens produce too much shade and cover the ground with needles so that grass can't really grow under them). To emulate this, create another terrain layer using the ArboreaTerrain.ground.Twig01AR texture to look like needles and twigs (UScale=2,VScale=2) and paint this underneath all of the trees. You will also need to un-paint the grass in those areas (even if the twig layer is on top of the grass, the grass layer is connected to the grass meshes, so you'll get tufts of grass popping up through your nice twigs if you don't).
- Now find some nice boulder meshes (such as CB-Desert1.Rocks.AW-PointyRock1a, ArboreaLanscape.Cliffs.littlerock01, and CB-Desert2.Rocks.CB-rock3), and place some of them around the valley in appropriate spots. Rotate and scale them so they don't all look like the same rock, and to keep things consistent, skin them with the same texture used for the rocky peaks around the valley.
- Un-paint the grass under the edges of the rocks where we would expect them to shade it out, so we'll see some dirt instead.
- Finally, we need some ambience. Add two or three AmbientSound actors around the edge of the valley with some wind sounds (OutdoorAmbience.BThunder.wind1, SoundRadius=500, SoundVolume=200, and vary the SoundPitch between 32 and 64). Now add an AmbientSound with Sound->AmbientSound set to None, and then add an entry to its Sound->SoundEmitters property to generate an intermittent sound. Set the EmitInterval to 10, EmitVariance to 5, and EmitSound to Sound'OutdoorAmbience.BThunder.bird2'. Create similar AmbientSounds with some other bird sounds (such as bird4, bird5, or bird6) and scatter them around the trees to make them sound inhabited.
There we have it, a nice peaceful sunlit little valley full of green grass and happy birds, ready to be drenched in blood!
Now might be a good time to add a temporary PlayerStart, fire up the map in the game, and have a nice leisurely stroll about your new world (make sure all the terrain's navigable, looks and sounds right in-game, etc.) Then, on to the real fun...
(There are a couple of touches which could still be added. Our skybox could use a bit of work, for example, by adding some clouds and a sun with a corona, and possibly some continuation of the terrain into the distance so it looks better if somebody goes up high enough in flying camera mode (alternately, we might just want to bring the ceiling down low enough that they can't do this). Realistically, some blocking volumes should also be erected around the sides of the valley to make sure people don't find a way up onto the peaks where they're not supposed to be (which could potentially screw up the planned assault balance), and we could probably make the base look a bit better with some more carefully chosen meshes, or some custom building, but we'll leave these details for the time being)
(Return to the Legacy:Assault Mapping Tutorial/Getting Started section of the Assault Mapping Tutorial)
This tutorial was originally written and contributed to the Wiki community by Foogod. Questions and comments are welcome! Please either leave them on my personal page or at the bottom of the relevant tutorial page. If you see something which is wrong or unclear and you think needs some correction, please feel free to edit the text directly (that's what the Wiki is for!), but please try to keep the tutorial flow intact (no thread discussions in the middle of the tutorial text, please).
Note: To reduce clutter, comments on the tutorial pages will be periodically moved to the Legacy:Assault Mapping Tutorial/Discussion page. Look there for older comments and thread discussions.
Comments:
Stino: Maybe the grass is a little to green :d
Hoyr: There is a couple of good grass textures in the ArenaTex package :)


